Django Installation and First App Tutorial
Django Installation and First App Tutorial: Django is a powerful web framework written in Python used to create pluggable database driven websites that are complex, but simplified by the abstraction of the Django framework. I am using Ubuntu for this install but beyond it will work for most OS’s. I will configure Django to use sqlite as a database. It can easily be swapped to use PostgreSQL, MySql, Sqlite or an Oracle database. The installation is pretty simple, getting to know the configuration files and framework is quite a bit more complicated depending on how much experience with Python and web development you have. For that reason, this is a super simple tutorial to break someone in to how Django operates.
For a quick review of Python a couple of tutorials can be found here. This tutorial has lots of pictures and makes the default polls tutorial a little easier to follow, theoretically :). One other reason to learn the Django framework is OpenStack uses it for Dashboard so it might help for editing templates or custom scripting.
Django Installation Tutorial
We will use Pip for the installation. Pip is a package management system used to install and manage software packages. Pip is platform agnostic just as Python itself. It is a replacement/wrapper for easy_install.
|
1 2 3 4 |
$ apt-get install git python-pip python-dev build-essential sqlite3 python-sqlite $ sudo pip install Django |
That put files into the /usr/local/lib/python2.7/dist-packages/django/ directory.
First Django Project
We will create out first project with the ‘django-admin.py startproject’ command. Get to know Django admin with
|
1 2 3 4 5 6 7 8 9 |
'django-admin.py --help'. $ cd /home/ $ django-admin.py startproject firstsite $ cd /home/brent/firstsite/firstsite $ ls #These are your site files. Now configure the Django settings.py file. That is the main configuration file for projects. First we will add the Sqlite database. $ nano /home/brent/firstsite/firstsite/settings.py |
from:
|
1 2 3 4 5 6 7 8 9 10 11 |
; html-script: false ]DATABASES = { 'default': { 'ENGINE': 'django.db.backends.', # Add 'postgresql_psycopg2', 'mysql', 'sqlite3$ 'NAME': '', # Or path to database file if using sqlite3. # The following settings are not used with sqlite3: 'USER': '', 'PASSWORD': '', 'HOST': '', # Empty for localhost through domain sockets o$ 'PORT': '', # Set to empty string for default. |
To:
|
1 2 3 4 5 6 7 8 9 10 11 |
; html-script: false ]DATABASES = { 'default': { 'ENGINE': 'django.db.backends.sqlite3', # Add 'postgresql_psycopg2', 'mysql', '$ 'NAME': 'firstProject.db', # Or path to database file if u$ # The following settings are not used with sqlite3: 'USER': '', 'PASSWORD': '', 'HOST': '', # Empty for localhost through domain sockets o$ 'PORT': '', # Set to empty string for default. |

Figure 1. settings.py should look like this.
$ cd /home/brent/firstsite
Synchronize the manage.db Sqlite database file. *Note, manage.py is in the root of the site directory not in the project directory.
$ python manage.py syncdb
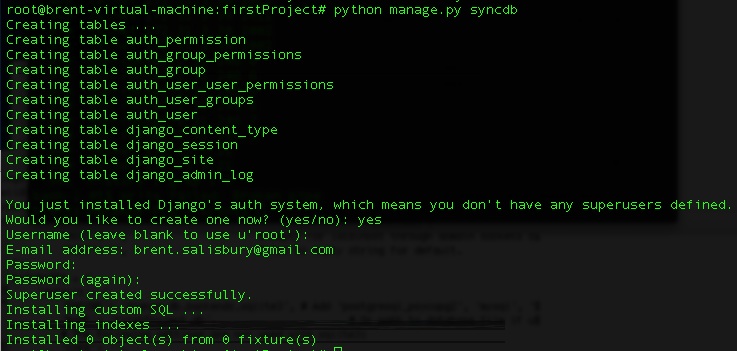
Figure 2. You will asked some questions to setup an account and password at this point.
Look in the directory now, you should see firstsite.db for the sqlite database
|
1 2 3 4 |
; html-script: false ]$ ls firstsite firstsite.db manage.py |
Start the Django Development Server
Let’s start the barebones Django framework.
Run this to start the server on all interfaces on TCP port 8000:
|
1 2 3 4 5 6 7 8 9 |
$ python manage.py runserver 0.0.0.0:8000 Validating models... 0 errors found September 11, 2012 - 00:09:12 Django version 1.5.dev20120910173111, using settings 'firstProject.settings' Development server is running at http://0.0.0.0:8000/ Quit the server with CONTROL-C. |
Figure 3. Server will look like this on startup on the CLI.
Test the default page in a browser at http://Host IP:8000
Ctrl+C to stop the server

Figure 4. The default page will look something like this.
Enable the Django Admin Control Panel
The admin site is not active by default. We already edited settings.py to enable the admin panel in that file. Now we need to edit urls.py in your project folder and uncomment three lines. These are the mappings to project pages. Since these sites are dynamically created there isn’t a htdocs like file.
Edit settings.py
$ nano cd /home/brent/firstsite/firstsite/settings.py
Edit settings.py from:
Under installed Apps list:
|
1 2 3 4 5 6 7 8 9 10 11 12 13 14 |
; html-script: false ]INSTALLED_APPS = ( 'django.contrib.auth', 'django.contrib.contenttypes', 'django.contrib.sessions', 'django.contrib.sites', 'django.contrib.messages', 'django.contrib.staticfiles', # Uncomment the next line to enable the admin: # 'django.contrib.admin', <--- Uncomment # Uncomment the next line to enable admin documentation: # 'django.contrib.admindocs', ) |
To the following Uncomment ‘django.contrib.admin’,:
|
1 2 3 4 5 6 7 8 9 10 11 12 13 |
; html-script: false ]INSTALLED_APPS = ( 'django.contrib.auth', 'django.contrib.contenttypes', 'django.contrib.sessions', 'django.contrib.sites', 'django.contrib.messages', 'django.contrib.staticfiles', # Uncomment the next line to enable the admin: 'django.contrib.admin', # Uncomment the next line to enable admin documentation: # 'django.contrib.admindocs', |
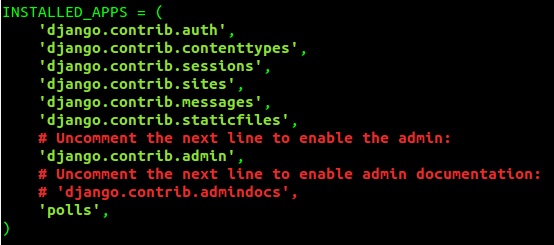
Figure 5. settings.py should look like this.
URLS.py
Next we need to enable Django to answer the url.py to answer for the /admin/ directory. urls.py uses regular expressions to match URL calls. For a tutorial on regular expressions click here. We will also add a regular expression to match the site of the App we will be creating ‘polls.views.index’ to setup the default index view for the App “polls”.
|
1 2 3 |
$ nano cd /home/brent/firstsite/firstproject/urls.py |
Edit From:
|
1 2 3 4 5 6 7 8 9 10 11 12 13 14 15 16 17 |
; html-script: false ]from django.conf.urls import patterns, include, url # Uncomment the next two lines to enable the admin: # from django.contrib import admin # admin.autodiscover() urlpatterns = patterns('', # Examples: # url(r'^$', 'firstsite.views.home', name='home'), # url(r'^firstsite/', include('firstsite.foo.urls')), # Uncomment the admin/doc line below to enable admin documentation: # url(r'^admin/doc/', include('django.contrib.admindocs.urls')), # Uncomment the next line to enable the admin: # url(r'^admin/', include(admin.site.urls)), ) |
In the following, uncomment three lines and it to:
|
1 2 3 4 5 6 7 8 9 10 11 12 13 14 15 16 17 18 |
; html-script: false ]from django.conf.urls import patterns, include, url # Uncomment the next two lines to enable the admin: from django.contrib import admin admin.autodiscover() urlpatterns = patterns('', # Examples: # url(r'^$', 'firstsite.views.home', name='home'), # url(r'^firstsite/', include('firstsite.foo.urls')), # Uncomment the admin/doc line below to enable admin documentation: # url(r'^admin/doc/', include('django.contrib.admindocs.urls')), # Uncomment the next line to enable the admin: url(r'^admin/', include(admin.site.urls)), url(r'^polls/$', 'polls.views.index'), ) |

Figure 6. urls.py will look like this.
Create Your First Django App
Create an App named “polls”. This is part of the modularity of Django since the App is decoupled from the web framework. A more advanced approach would be to create a urls.py file in your App directory instead of using the sites urls.py. For now we will keep it simple.
|
1 2 3 4 5 |
$ cd /home/brent/firstproject $ python manage.py startapp polls $ nano /home/brent/firstproject/firstproject/settings.py |
Change From:
|
1 2 3 4 5 6 7 8 9 10 11 12 13 14 |
; html-script: false ]INSTALLED_APPS = ( 'django.contrib.auth', 'django.contrib.contenttypes', 'django.contrib.sessions', 'django.contrib.sites', 'django.contrib.messages', 'django.contrib.staticfiles', # Uncomment the next line to enable the admin: 'django.contrib.admin', # Uncomment the next line to enable admin documentation: # 'django.contrib.admindocs', ) |
To:
|
1 2 3 4 5 6 7 8 9 10 11 12 13 14 15 |
; html-script: false ]INSTALLED_APPS = ( 'django.contrib.auth', 'django.contrib.contenttypes', 'django.contrib.sessions', 'django.contrib.sites', 'django.contrib.messages', 'django.contrib.staticfiles', # Uncomment the next line to enable the admin: 'django.contrib.admin', # Uncomment the next line to enable admin documentation: # 'django.contrib.admindocs', 'polls', ) |
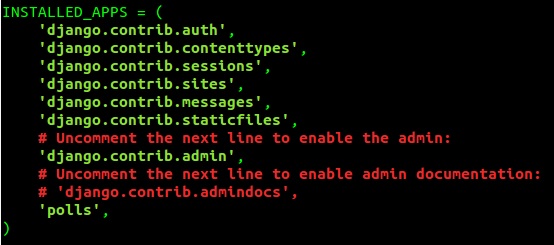
Figure 7. Add your polls App into settings.py
Edit models.py
$ nano /home/brent/firstproject/polls/models.py
Change /home/brent/firstproject/polls/models.py
From:
|
1 2 3 4 |
; html-script: false ]from django.db import models # Create your models here. |
To:
|
1 2 3 4 5 6 7 |
; html-script: false ]from django.db import models # Create your models here. class Poll(models.Model): print('These are your classes as you start building real apps') |

Figures 8. models.py will look like this.
Add the App to the Admin Control Panel in admin.py
Create admin.py in the polls directory
$ nano /home/brent/firstproject/polls/admin.py
|
1 2 3 4 5 6 |
; html-script: false ]from django.contrib import admin from polls.models import Poll admin.site.register(Poll) |
Views.py
The last configuration is to edit view.py. That is the view you will see in that directory that is called from urls.py.
$ nano /home/brent/firstproject/polls/views.py
# Create your views here.
|
1 2 3 4 5 6 |
; html-script: false ]from django.http import HttpResponse def index(request): return HttpResponse("Hello, world from the polls App! L33t") |

Figure 10. views.py will look like this.
Sync the DB and start the development server.
|
1 2 3 4 5 6 |
$ python manage.py syncdb $ python manage.py runserver 0.0.0.0:8000 Point your web browser at the Django /admin/ directory. http://IP of Host:8000/admin/ |
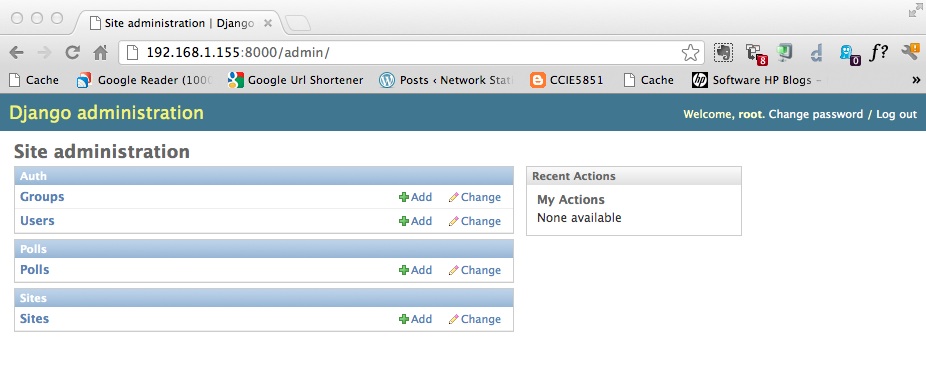
Figure 11. The admin control panel looks like this with your app in there.
Now point your web browser at the polls directory. http://host ip:8000/polls/
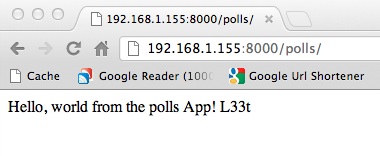 Figure 12. You should see your first ub3r l33t App!
Tutorials
This tutorial is barely touching the surface. There are tons of them at the following links.
Tutorials: https://code.djangoproject.com/wiki/Tutorials
Installation Guide and the Complete Polls tutorial to actually do something: https://docs.djangoproject.com/en/dev/intro/install/
Hope this helps a couple folks cause I have spent some frustrating times learning the bits and pieces I know now of the framework here and there 🙂 Happy Hacking!




Hey Brent,
You’ve inspired me to get cracking into Django. Setting up my first app now. Thanks for the post.
/John H the C
Awesome John, Let me know what you get into. I keep meaning to dig into node.js too but havent seemed to nail down the whole freeze time for 2 years to catch up on everything I am meaning to do 🙂 Cheers brother.
Hello there,
I’ve been at this for the past few hours, I installed django and opened up my python shell and verified the version. When i go back and try to set up a new site I get django-admin.py command not found. Do you know what I am doing wrong?
Hi Dan, I wonder if you are running into the Python $PATH being different from your bash/shell path? Python can be tricky with paths unfortunately. Virtualenv might help too. Take a peek here and the official guide linked in the post. http://stackoverflow.com/questions/8250086/command-not-found-django-admin-py
See if that helps, if not paste what you are seeing and I can poke around.
Thanks,
-Brent
I think that is it. I checked my environment variables for both the user and the system and I didn’t see anything in there linking them to python or django.
Can you walk me through it so I dont mess anything up?
Thanks
Ok well I just went ahead and set them. From the shell I tested it (by the way I am using the GIT GUI shell on windows).
First I typed in
$ python
from there python booted up and I got the >>>
so I typed import django and then django.get_version() and everything works.
Next I exited python and tried to set up the test site from the tutorial.
$ django-admin.py startproject mysite
I get the same error.
Nice tutorial about Django tutorial application, is possible to upload this to GAE? i tried but i have not fixed it.
Thanks