Update: My latest installation document for Folsom can be found here. It’s too tough to try and keep up with debugging installers myself so I am just using DevStack in that tutorial. Thanks!
Well, we have OpenStack running on a couple of nodes now what? Let’s install WordPress on two nodes with web server running Apache on one node and MySql on another compute node.
Apache2 web server install on the frontend node named wpressfront
MySql install on the backend node named wpressback

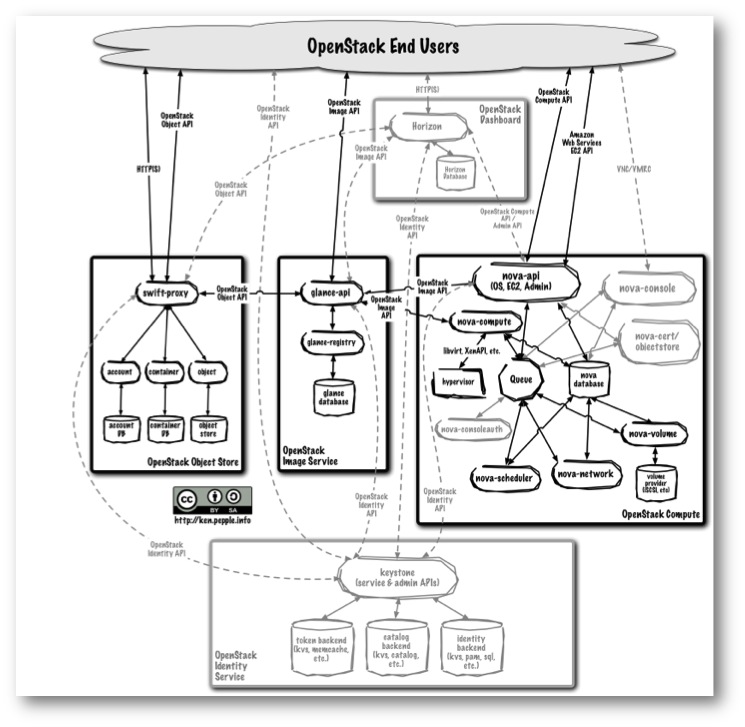
The logical layout essentially looks like this from the OpenStack Admin Guide.
Connect to a compute node:
#ssh -i wordp.pem ubuntu@10.1.0.5
(Find the address of the compute node from the Nova Dashboard)
#sudo passwd root
#su
Next part is only if you had the same problems I have had from the EC2 apt-get repository being out of sync on checksums. I am just changing them to the vanilla repos from a standard install.
#mv /etc/apt/sources.list /etc/apt/sources.list.bk
(make a bakup if you want to use EC2 repo in the future)
Paste in the /etc/apt/source.list from below
deb http://us.archive.ubuntu.com/ubuntu/ oneiric main restricted
deb http://extras.ubuntu.com/ubuntu oneiric main
deb-src http://extras.ubuntu.com/ubuntu oneiric main
deb http://security.ubuntu.com/ubuntu oneiric-security main restricted
deb-src http://security.ubuntu.com/ubuntu oneiric-security main restricted
deb http://security.ubuntu.com/ubuntu oneiric-security universe
deb-src http://security.ubuntu.com/ubuntu oneiric-security universe
deb http://security.ubuntu.com/ubuntu oneiric-security multiverse
deb-src http://security.ubuntu.com/ubuntu oneiric-security multiverse
deb http://us.archive.ubuntu.com/ubuntu/ oneiric multiverse
deb-src http://us.archive.ubuntu.com/ubuntu/ oneiric multiverse
deb http://us.archive.ubuntu.com/ubuntu/ oneiric-updates multiverse
deb-src http://us.archive.ubuntu.com/ubuntu/ oneiric-updates multiverse
deb http://us.archive.ubuntu.com/ubuntu/ oneiric-backports main restricted universe multiverse
deb-src http://us.archive.ubuntu.com/ubuntu/ oneiric-backports main restricted universe multiverse
deb-src http://us.archive.ubuntu.com/ubuntu/ oneiric main restricted
deb http://us.archive.ubuntu.com/ubuntu/ oneiric universe
deb-src http://us.archive.ubuntu.com/ubuntu/ oneiric universe
deb http://us.archive.ubuntu.com/ubuntu/ oneiric-updates universe
deb-src http://us.archive.ubuntu.com/ubuntu/ oneiric-updates universe
Get a key and update repo:
#apt-key adv –keyserver keyserver.ubuntu.com –recv-keys 437D05B5 3E5C1192
#apt-get update
Install
# apt-get install libdbd-mysql-perl
#apt-get install mysql-client-core-5.1 mysql-client-5.1
#apt-get install mysql-server
Edit MySql conf file
#nano /etc/mysql/my.cnf
# Instead of skip-networking the default is now to
listen only on
# localhost which is more compatible
and is not less secure.
bind-address = x.x.x.x (or) 0.0.0.0 for all IPs on the host.
Log into MySQL on wpressback:
mysql -u root –p (Then prompted for passwd)
wpressdb = DB name
wpress = username
123 = password
mysql> CREATE DATABASE wpressdb;
Query OK, 1 row affected (0.01 sec)
mysql> CREATE USER wpress;
Query OK, 0 rows affected (0.00 sec)
mysql> SET PASSWORD FOR ‘wpress’ = PASSWORD(‘123’);
Query OK, 0 rows affected (0.00 sec)
mysql> GRANT ALL PRIVILEGES ON wpressdb.* TO ‘wpress’ IDENTIFIED BY ‘123’;
Query OK, 0 rows affected (0.01 sec)
mysql> exit
Now lets connect to the other node wpressfront and setup the Apache web server.
Connect to the second compute node and repeat the initial piece:
#ssh -i wordp.pem ubuntu@10.1.0.6 (find the address of the compute node from the Nova Dashboard)
#sudo passwd root
#su
Next part is only if you had the same problems I have had from the EC2 apt-get repository being out of sync on checksums. I am just changing them to the vanilla repos from a standard install.
#mv /etc/apt/sources.list /etc/apt/sources.list.bk
Paste in the /etc/apt/source.list from below
deb http://us.archive.ubuntu.com/ubuntu/ oneiric main restricted
deb http://extras.ubuntu.com/ubuntu oneiric main
deb-src http://extras.ubuntu.com/ubuntu oneiric main
deb http://security.ubuntu.com/ubuntu oneiric-security main restricted
deb-src http://security.ubuntu.com/ubuntu oneiric-security main restricted
deb http://security.ubuntu.com/ubuntu oneiric-security universe
deb-src http://security.ubuntu.com/ubuntu oneiric-security universe
deb http://security.ubuntu.com/ubuntu oneiric-security multiverse
deb-src http://security.ubuntu.com/ubuntu oneiric-security multiverse
deb http://us.archive.ubuntu.com/ubuntu/ oneiric multiverse
deb-src http://us.archive.ubuntu.com/ubuntu/ oneiric multiverse
deb http://us.archive.ubuntu.com/ubuntu/ oneiric-updates multiverse
deb-src http://us.archive.ubuntu.com/ubuntu/ oneiric-updates multiverse
deb http://us.archive.ubuntu.com/ubuntu/ oneiric-backports main restricted universe multiverse
deb-src http://us.archive.ubuntu.com/ubuntu/ oneiric-backports main restricted universe multiverse
deb-src http://us.archive.ubuntu.com/ubuntu/ oneiric main restricted
deb http://us.archive.ubuntu.com/ubuntu/ oneiric universe
deb-src http://us.archive.ubuntu.com/ubuntu/ oneiric universe
deb http://us.archive.ubuntu.com/ubuntu/ oneiric-updates universe
deb-src http://us.archive.ubuntu.com/ubuntu/ oneiric-updates universe
Get a key and update repo:
#apt-key adv –keyserver keyserver.ubuntu.com –recv-keys 437D05B5 3E5C1192
#apt-get update
#apt-get install apache2 libapache2-mod-php5 php5-mysql
Download first the latest WordPress version using this command from the terminal:
#wget http://wordpress.org/latest.tar.gz
Extract the archive file with this command:
#tar -xzvf latest.tar.gz
Create now a folder for WordPress in the /var/www directory using this command:
#mkdir /var/www/wordpress
Now move all WordPress files to this created folder using this command:
#cp -r wordpress/* /var/www/wordpress
If you are installing WordPress in a subdirectory not in the root directory (/var/www), then edit the apache2.conf file with this command:
#nano /etc/apache2/apache2.conf
At the end of the apache2.conf file, insert this line:
AddType application/x-httpd-php .html
I added ‘chmod 777 /var/www/wordpress/’ for the permissions. I am a network guy, not web guy, I cant remember what the best practice on permissions are lol. This lab is anything but secure. Just dont want to set off a 4-alarm ner alert on this post.
chmod 777 /var/www/wordpress/
Then go to http://(wpressfront IP)/wordpress/wp-admin/ or http://(wpressfront IP)/wordpress/ and tinker around with the web app until it is how you want it.
Done!


Hi Brent, nice job u did. I stuck at getting keys from keyserver.ubuntu.com
apt-key adv –keyserver keyserver.ubuntu.com –recv-keys 437D05B5 3E5C1192
i got this : usage: gpg [options] [filename]
I tried to force port 80 on keyserver but no succes,
thanks
The same thing happened to me.
To solve the issue I just used the apt source list of the lastest Ubuntu release, in my case 12.04.