How to Build an SDN Lab without Needing OpenFlow Hardware
How do you build a networking lab without networking equipment? Yet another plus in the column of open software driven networks. Proofing and prototyping networks today are often done with things like NETFPGA or expensive vendor manufactured hardware. Since we are beginning to build primitives, APIs and abstraction layers the value of what the software development community has had for two decades is becoming obvious to networking.
Update: For a more updated and scripted install take a peek at this post:
- OpenFlow, OpenvSwitch and KVM SDN Lab Installation App
- I have lately started using the worlds greatest 8MB Linux kernel linux-0.2.img.bz2. Using that instead of a full blown distribution especially if nesting your VMs inside your Mac or PC. Since all you need is a basic networking stack and kernel this is perfect for the networking lab.
Quit a few of us are working on wrapping our heads around what the current and future state of Software Defined Networks (SDN) will look like. To build or modify modules and applications we need a proper lab to do this in. Something I run into quite often is the idea that we need OpenFlow enabled hardware to build this lab. The great news is we absolutely do not need personally once that dawned on me a vSwitch as really all I ever need for modeling and prototyping. Once you need performance benchmarks and metrics transitioning to hardware starts making sense.
Two Easy OpenFlow Lab Options
- Run a Hypervisor like KVM or XEN with Open vSwitch managing the VM nodes. This requires Hardware Virtualization.
- Run multiple VM instances each running Open vSwitch and using multiple bridges to create unique Data Path IDs (DPID) that essentially appear as different hosts. This is less hardware requirements but is a bit less flexible from seeing what the host is doing. That said you could spin up dozens of vSwitches under the control of single or separate OF controllers and instantiate data paths. An example of this option is in this post. All you need to do after that is attach each bridge to a controller and now data paths are built by the OF controller rather than the OVS slow path. There are quite a few controllers out there. I primarily use POX (Python) and Floodlight (Java) since both have the best maintenance and community from what I have been exposed to along with easy modules to use, adjust or spin your own. The documented APIs are coming along as well. FloodLight probably has the slight edge there but I prefer Python so its a wash for me. POX does not have a monetized product attached to it (BigSwitch) which would be attractive to some folks also.
OpenFlow Hardware Limitations
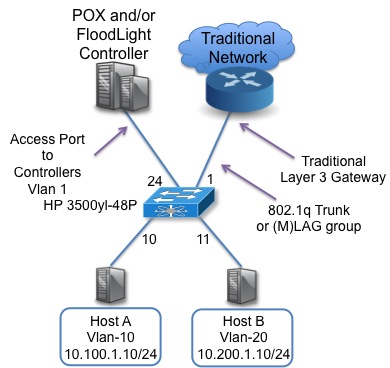
With both options you can integrate physical hardware which is essentially the SDN roadmap topology being proposed in data center solutions today. A development environment is ideal to have in software to quickly change components and designs. The other key part is that we are not contained in software by the shortcomings of hardware matches today. For example, HP switches cannot match on layer 2 fields so ether type and mac src and dest are wild carded. Other vendors can only match source OR destination IP rather than both. These constraints are due to limited amounts of TCAM and/or Software development limitations at this point. Also who wants to have to get up and move cables and soak your power bill 🙂
Figure 1. Using a physical Switch for you lab.
Figure 2. Using a vSwitch for your lab. Same topologies and logically similar, programmatically the same. Why is that? We finally actually have a HAL or instruction set/primitive providing abstraction. Yay!
Lab Prerequisites
The KVM requires an x86 machine with either Intel VT or AMD w/AMD-V support. Anything fairly new will have that support in the processor. There are a few older HW builds that support hardware assisted virtualization by enabling it in the bios.
This is done on a fresh install of 64-bit Ubuntu 12.04 (Precise).
Video: Installation Screencast Part I
Uninstall network-manager if running Ubuntu desktop (optional) ,not required but you will likely have to troubleshoot past it if you don’t. This will likely cut you off if remote.
System Preparation (Optional)
|
1 2 3 |
$apt-get update $apt-get dist-upgrade |
Install OpenvSwitch
|
1 2 3 4 5 6 |
$apt-get purge network-manager $ apt-get install openvswitch-datapath-source bridge-utils $ module-assistant auto-install openvswitch-datapath $ apt-get install openvswitch-brcompat openvswitch-common |
Verify install
|
1 2 3 |
$ovs-vsctl show ovs_version: “1.4.0+build0″ |
Processes should look something like this
|
1 2 3 4 5 6 7 8 |
$ps -ea | grep ovs 26464 ? 00:00:00 ovsdb-server 26465 ? 00:00:00 ovsdb-server 26473 ? 00:00:00 ovs-vswitchd 26474 ? 00:00:00 ovs-vswitchd 26637 ? 00:00:00 ovs-controller |
Enable bridge compatability
|
1 2 3 |
; html-script: false ]/etc/default/openvswitch-switch |
and change brcompat from no to yes Change from:
#BRCOMPAT=no
TO and uncomment by removing the #:
BRCOMPAT=yes
Restart OVS
|
1 2 3 |
; html-script: false ]$ /etc/init.d/openvswitch-switch restart |
Add your bridge, think of this as a subnet if you aren’t familiar with the term.
|
1 2 3 |
; html-script: false ]$ ovs-vsctl add-br br-int |
Add a physical interface to your virtual bridge for connectivity off box. If you don’t script this part you will probably clip your connection as you zero out eth0 and apply it to br-int. You can pop the commands into a text file and make it executable with chmod +x <filename>,
|
1 2 3 4 |
; html-script: false ]$ ovs-vsctl add-port br-int eth0 $ ifconfig eth0 0 |
Zero out your eth0 interface and slap it on the bridge interface (warning will clip you unless you script it)
|
1 2 3 |
; html-script: false ]$ifconfig br-int 192.168.1.208 netmask 255.255.255.0 |
Change your default route
|
1 2 3 |
; html-script: false ]$route add default gw 192.168.1.1 br-int and $route del default gw 192.168.1.1 eth0 |
SDN Controller Option A: FloodLight (Java)
Install dependencies, apt-get for UB and yum for RH:
|
1 2 3 |
; html-script: false ]$apt-get install build-essential default-jdk ant python-dev eclipse git |
Clone the Github project and build the jar and start the controller:
|
1 2 3 |
; html-script: false ]$git clone git://github.com/floodlight/floodlight.git |
cd into the floodlight directory created.
|
1 2 3 |
; html-script: false ]$cd floodlight |
Run ant to build a jar. It will be in the ~/floodlight/target directory.
|
1 2 3 |
; html-script: false ]$ant |
Run the controller :
|
1 2 3 |
; html-script: false ]$java -jar target/floodlight.jar |
By default it will binds to port 6633 and all ports e.g. 0.0.0.0/0.0.0.0:6633
SDN OpenFlow Controller Option B: POX (Python)
|
1 2 3 4 5 6 7 |
; html-script: false ]$ sudo apt-get install git $ git clone http://github.com/noxrepo/pox $ cd pox $ ./pox.py forwarding.l2_learning $ NOX&gt; |
By default it will binds to port 6633 and all ports e.g. 0.0.0.0/0.0.0.0:6633
Attach OpenvSwitch to the Controller
|
1 2 3 |
$ovs-vsctl set-controller br-int tcp:192.168.1.208:6633 |
In the FloodLight console you will see something similar to what is directly below. The DPID is the unique Data Path Identifier (DPID) of the switch not the controller.
|
1 2 3 |
; html-script: false ][New I/O server worker #1-1] INFO n.f.core.internal.Controller - Switch handshake successful: OFSwitchImpl [/192.168.1.208:49519 DPID[00:00:ba:66:35:e8:38:48]] |
The output of OVS ‘ovs-vsctl show’ looks something like this:
|
1 2 3 4 5 6 7 8 9 |
; html-script: false ]# ovs-vsctl show 70a40219-8725-46a8-b808-af75c642cac8 Bridge "br-int" Controller "tcp:192.168.1.208:6633" is_connected: true Port "eth0" Interface "eth0" Port "br-int" Interface "br-int" type: internal ovs_version: "1.4.0+build0" |
Install KVM and Integrate into OVS
|
1 2 3 |
$apt-get install kvm uml-utilities |
These two scripts bring up the KVM Tap interfaces into your bridge from the CLI. If you copy and paste below make sure the (‘) does not get formatted improperly. It should be yellow in nano. “switch=br-int” br-int is the name of your bridge in OVS.
$nano /etc/ovs-ifup (open and paste what is below)
|
1 2 3 4 5 |
; html-script: false ]#!/bin/sh switch='br-int' /sbin/ifconfig $1 0.0.0.0 up ovs-vsctl add-port ${switch} $1 |
In the directory /etc/ovs-ifdown open and paste what is below:
|
1 2 3 4 5 |
; html-script: false ]#!/bin/sh switch='br-int' /sbin/ifconfig $1 0.0.0.0 down ovs-vsctl del-port ${switch} $1 |
Make both files executable
|
1 2 3 |
; html-script: false ]chmod +x /etc/ovs-ifup /etc/ovs-ifdown |
Video: Installation Screencast Part II
Spin up the VMs
Note: If you chose to use the small linux kernel replace Ubuntu image with this linux-0.2.img.bz2. Recommended for those comfortable configuring Linux networking from command line. Examples are:
|
1 2 3 4 5 |
; html-script: false ]ifconfig eth0 192.168.1.150 netmask 255.255.255.0 route add default gw 192.168.1.1 echo nameservers 8.8.8.8 >> /etc/resolv.conf |
- Host1
|
1 2 3 |
; html-script: false ]kvm -m 512 -net nic,macaddr=00:00:00:00:cc:10 -net tap,script=/etc/ovs-ifup,downscript=/etc/ovs-ifdown -cdrom ubuntu-12.04-desktop-amd64.iso |
- Host2
|
1 2 3 |
kvm -m 512 -net nic,macaddr=00:11:22:CC:CC:10 -net tap,script=/etc/ovs-ifup,downscript=/etc/ovs-ifdown -cdrom ubuntu-12.04-desktop-amd64.iso |
- Host3
|
1 2 3 |
kvm -m 512 -net nic,macaddr=22:22:22:00:cc:10 -net tap,script=/etc/ovs-ifup,downscript=/etc/ovs-ifdown -cdrom ubuntu-12.04-desktop-amd64.iso |
Each one of those will begin loading from the ISO. I just click “Try Ubuntu” when they are booting and just run them from disk since really all we need are nodes that can test connectivity as we push static flows. If it is a more permanent test lab it would make since to install them to disk. These are your hosts you can test with.
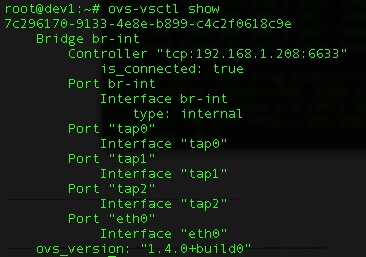
Figure 3.Open vSwitch Taps (Vnic/Vnet)
Onecs the VM hosts have booted up assign IP addresses to them by clicking in the top left of the Ubuntu window and type in ‘terminal’ no parentheses. Then give them IPs if you want to statically assign them with ifconfig.
|
1 2 3 |
$sudo ifconfig eth0 192.168.1.x netmask 255.255.255.0 (on the VM) |
Now that you have that, here are some example labs with the POX SDN Controller: Lab installation


I’ve been grappling with the following challenge, hoping that you can give me the pointers needed:
I want to bring up OVS inside an LXC container, kinda backwards from what’s usually done, without(!!) BRCOMPAT=yes and without having to compile a kernel module.
It seems doable, but I’m confused. Advice warmly accepted.
Thanks so much,
Yitzhak
Hi
I am try to learn about openflow and openvswitch. The setup which I am trying to create
Controller
/\
/ \
/ \
/ \
Ovs Br0——Ovs Br1
| |
| |
VM1 VM2
The setup is on single Ubuntu host machine. The OVS Br0 and Br1 is connected using patch cable and VM1(Qemu-kvm) and
VM2(Qemu-kvm) are connected to respective Bridges using tap interface created using tunctl. VM1 and VM2 are different
subnet. I want ping from VM1 to VM2. How should I do it using openflow controllers.
Thanks in Advance
Deepankar
Hey …R we trying to install controller and vswitch in the same ubuntu machine….
will this configs work if two vms are present (1 for controller and other for switch ???)