Install WordPress on Ubuntu and Migrate an Existing Site
Install WordPress on Ubuntu and Migrate an Existing Site: This is a guide on how to install WordPress on Ubuntu and migrate and existing site to new host or a test/dev environment. WordPress is an Open Source free package that started out as a platform for blogging and has since morphed into other more CMS like uses. Their are thousands of plugins that have been written for WordPress for styling and functionality. I like it for blogging but have done installs for business centric usage for other folks. The simplicity is appealing along with the many tools that lower the barrier to entry into getting content to the customer or reader with little to no development work if setup properly. This post is for folks to get their feet wet or to install a “sandbox” development environment to test new themes, plugins or functionality using Ubuntu as the OS platform.
The first half of the post is just installing a generic WordPress server so if thats all you need that will take care of you. The second half will be exporting data and importing it into the sandbox or new host.
Installing WordPress Requirements
First get a working physical or even easier virtual machine running. You can use VirtualBox for free or some of the commercial desktop/laptop focused hypervisors like Parallels or VM Fusion. Then get a working Ubuntu install as shown in this how-to.
Install WordPress from Ubuntu Packages
As root:
|
1 2 3 |
apt-get install wordpress libapache2-mod-php5 php5-mysql mysql-server apache2 php5 |
Create a symbolic link from the WordPress directory to the default Apache2 directory for serving pages.
|
1 2 3 |
ln -s /usr/share/wordpress /var/www/wordpress |
Run the included bash script to pre-configure your WordPress framework. Add the IP you want the service bound to. If you do not want anyone off the box to be able to create a socket to the service you can substitute the IP with localhost.
|
1 2 3 4 |
gunzip /usr/share/doc/wordpress/examples/setup-mysql.gz bash /usr/share/doc/wordpress/examples/setup-mysql -n wordpress <Insert IP Here> |
For a dev environment this is acceptable for changing permissions of the WordPress directory.
|
1 2 3 |
chown -R www-data /usr/share/wordpress |
Restart Apache2 or else you will get PHP module errors.
|
1 2 3 |
/etc/init.d/apache2 restart |
If not you will get the following error in your browser.
|
1 2 3 |
Your PHP installation appears to be missing the MySQL extension which is required by WordPress. |
Here is the command line output of the installation at Pastebin
The WordPress install is complete, now lets configure the WordPress platform.
Configure WordPress
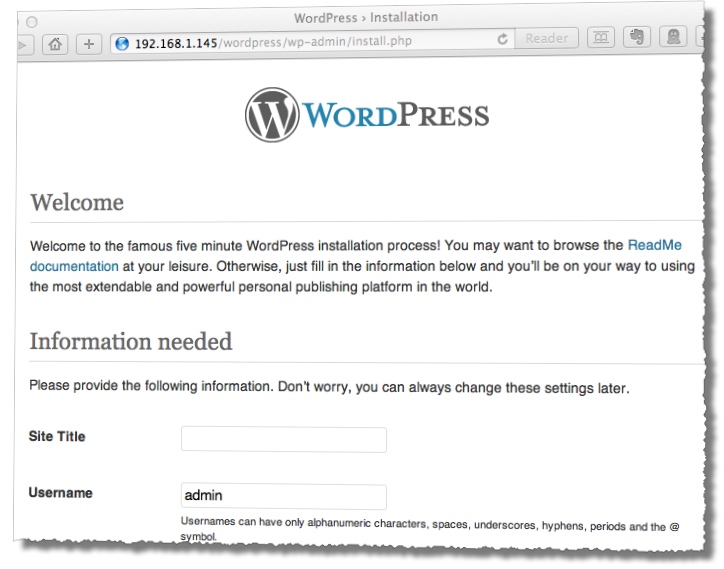
Figure 1. Point your browser at your ip and the ‘wordpress’ directory.
|
1 2 3 |
e.g. http://192.168.1.145/wordpress/ |
Setup your site title and username and password, submit and login.
Before we go any further we need to adjust the default 2MB upload limit.
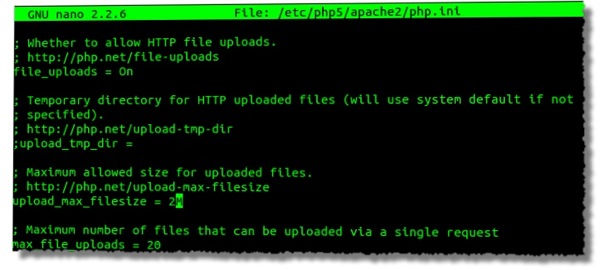
Figure 2. Edit /etc/php5/apache2/php.ini and adjust the upload_max_filesize = to 64M or something around there to avoid memory issues much larger.
|
1 2 3 4 |
nano /etc/php5/apache2/php.ini /etc/init.d/apache2 restart |
Be sure to restart Apache after you edit php.ini . If not you will get the following error in your browser.
|
1 2 3 |
Your PHP installation appears to be missing the MySQL extension which is required by WordPress. |
Next log into the site and go to Settings -> Media, Change adjust your paths. Store uploads in this folder to -> wp-content/uploads. and clear the path box.
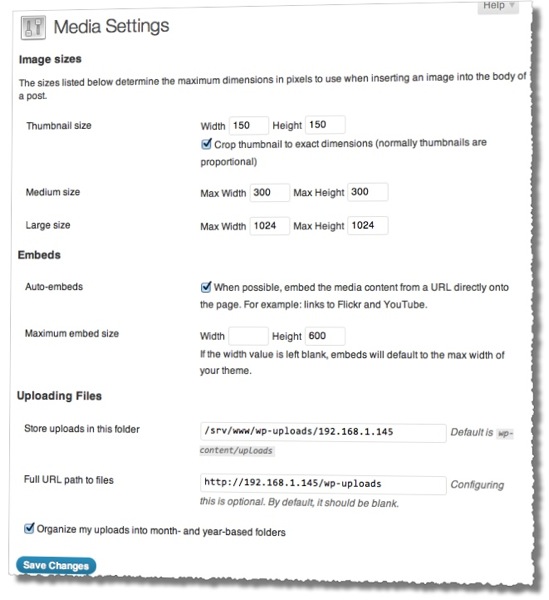
Figure 3. It will look like this from the install script. Change it from this to look like the next image in figure #4.

Figure 4. You can blank both boxes or explicitly define them.
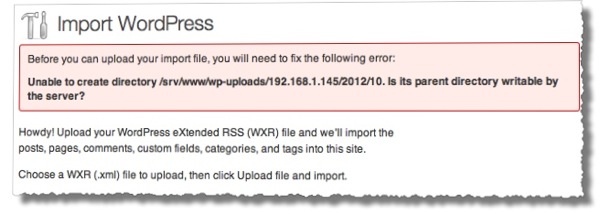
Figure 5. If you do not edit your path properly you will get an error such as this. “is parent directory writeable by the server?”. aka path not found. For troubleshooting consult the Apache logs as shown below.
|
1 2 3 4 |
more /var/log/apache2/access.log more /var/log/apache2/error.log |
That completes a base installation. Now you can browse WordPress Themes and WordPress Plugins from Appearance and Plugins menu in the left bar of your Dashboard. FYI, Dashboard will be your main administrative view into your WordPress site located in the top left of the menu.
Migrate an Existing WordPress Site
You can do this through a full backup in the Cpanel and download the tarball or FTP to your site and copy down the ‘wp-content’ directory and everything below it.
Check your wp-config.php and get the credentials you are importingand make sure they are the same as your MySql install or change them to reflect what you used or else you will get MySql connection errors like so:
“Error establishing a database connection wordpress”
Export Existing WordPress Backup
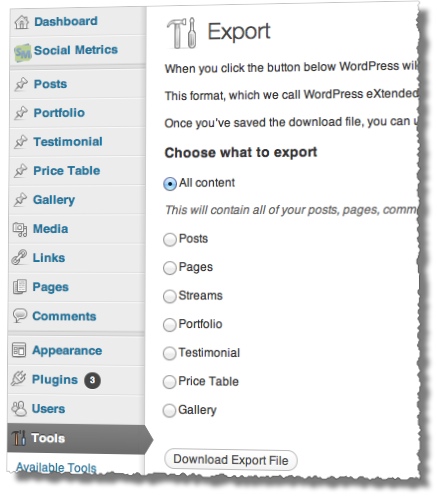
Figure 6. Export the WordPress DataBase and choose all content.
Next on your production server or wordpress instance export the database pointers to posts and pages. Do this through wp admin, tools -> export “all content”. This will give you an XML export to download.
Import Existing WordPress Data
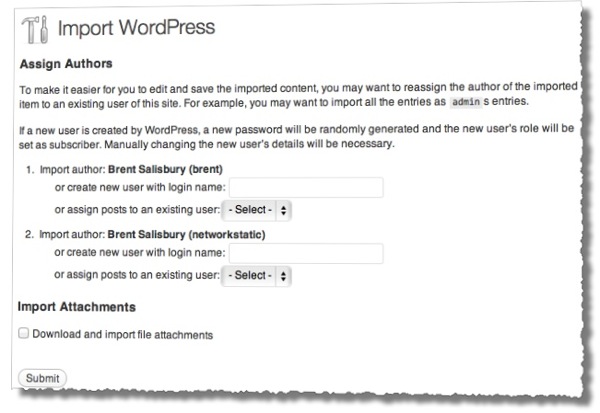
Figure 7. Go to Tools -> Import and import what you just exported WordPress or Server. Locate and import the XML file containing the WordPress database and choose your username to import it under.
You may need to manually download the WP Import Plugin and pop it in wp-content/plugins and then activate it through settings->plugins. If you get an error about not being able to write the import set your permisions again with:
|
1 2 3 |
chown -R www-data /usr/share/wordpress |
navigate to /usr/share/wordpress/ and please make SURE you are on the test box and not your PRODUCTION server! First backup the default directory in case you need to check a vanilla config for refrence or worse accidently delete your production files. Clear out the /usr/share/wordpress/ directory on the new WordPress host.
|
1 2 3 4 5 |
tar -cvf wp-conf-bk.tar /usr/share/wordpress/ mv wp-conf-bk.tar ~ rm -rf /usr/share/wordpress/* |
Then copy your downloaded full wordpress backup “public_html” containing all the php, wp-admin, wp-content etc into /usr/share/wordpress/ from ftp or through the cpanel from your hosting provider. May need to set permissions one more time after you move the existing content in if so just run ‘chown’ (change ownership) again.
|
1 2 3 |
chown -R www-data /usr/share/wordpress |
WordPress Install and Migration Complete
You should be good to go now and have a sandbox to test themes, plugins, tweaks etc without destroying your production site. I tend to do all of this in a VMfusion or VirtualBox instance so I can snapshot and rollback and don’t have to worry about trashing anything or manually rolling back. VM rollbacks nd snapshots are our friends, especially people like me that needs to break something a few times before putting it together. This takes some trial and error getting used to manipulating WordPress at this invasively, so happy blogging!
Thanks for stopping by and don’t wait, get out there and share your ideas and thoughts with the community!






Very thorough article Brent… did you do a redesign (theme) with your migration? Looks very good regardless. Question. How many folks will still run “rm -rf /usr/share/wordpress/*” on their production server? I’ll guess that you’ll get one or two at least.
Cheers!
Yessir, I did a new theme and tested with this on the way. I agree, I need to change that to tar and backup lol. Thanks Michael !