Update: My latest installation document for Folsom can be found here. It’s too tough to try and keep up with debugging installers myself so I am just using DevStack in that tutorial. Thanks!
Here is a Python Script I put together for installing OpenStack Essex on either your laptop in a Virtualbox VM running Qemu or on a standalone server/box for more of a production like environment using KVM. I recommend using a script install to get your feet wet and then do manual installs to understand the components. Then come back to scripts. Openstack has so many pieces and parts right now the only way to get the same install every time is by scripting it. Devstack has some really impressive scripts but this is a much more simple one as I needed something nice and linear to give to some friends. The installer will take care of it itself if it has two Nics (1 can be fake in a VM), Internet access and the right environmentals. Using QEMU in a nested hypervisor performance is beyond terrible so be prepared to be frustrated unless you want anything other than understanding how to install OpenStack. I just use this to quickly get a box up, it is not something I support, recommend etc other than getting to learn OpenStack.
Video 2. w/the Installer on a standalone server with 2/Nics and Removal.
The Python code is mostly system calls and I didn’t define any modules or objects/classes to keep it super simple and linear. That will make it really easy for anyone to add in their own lines or use it for documenting their manual install if they wanted. I am a very sloppy coder and get bored with it by the time its almost done but this works, I debugged it quite a bit. It will take a few times to probably catch the nuances. Making sure the environmentals get pasted is normally a gotcha. It’s a pain trying to get ENVs exported into a user bash session from Python so you need to paste them before you run the “python script-name.py”. For a VM install you have to make the variable in the script hyperv=qemu and if on a physical box you can use hyperv=kvm. In the 2nd video I show editing the script for a box at work rather than on my laptop at home.
There is a bash script below that you can run to cleanup an install on a physical box so you can reinstall if you encounter errors. If your install has problems you can run “./stack-cleanup.sh” and the reboot. That will remove most of the parts to re-install using the python installer. I highly recommend a reboot may be needed in between removal and re-install, that said I normally dont but every now and then the network piece doesn’t do well without a reboot. I have done it without ever rebooting a few times tho. The video below I had just ripped an install out and just ran the script to install again with no errors. For Virtualbox installs just take a snapshot of the Ubuntu install prior to running the Python script, if your install gets squarely you can just restore the original snapshot.

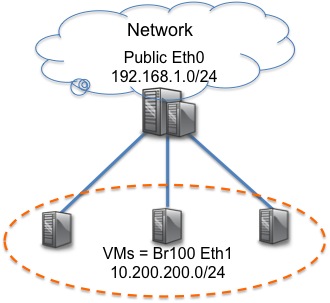
Figure 1. The topology, Eth0 is the public Eth1 is the backend.
Before you run python (script name).py.
System Preperation
You have to add your environmental variables. THis is installed with the root account. In Ubuntu thats ‘passwd root (set passwd)’.
Download the OpenStack Removal Script Here
1. Paste what is below into your shell you are running the script in and then run ‘source .bashrc’. Lots of ways to do this, this is just one way. When you type export in your shell it is very important you see the variables below. Copy and paste what is below. openstack is the password.
ENVs are Very Important to OpenStack
|
1 2 3 4 5 6 7 8 9 10 11 12 13 14 15 |
; html-script: false ]export OS_PASSWORD=openstack export SERVICE_TOKEN=openstack export OS_TENANT_NAME=admin export OS_USERNAME=admin export SERVICE_ENDPOINT="http://localhost:35357/v2.0" export OS_AUTH_URL="http://localhost:5000/v2.0/" echo declare -x OS_PASSWORD=openstack >> /root/.bashrc echo declare -x SERVICE_TOKEN=openstack >> /root/.bashrc echo declare -x OS_TENANT_NAME=admin >> /root/.bashrc echo declare -x OS_USERNAME=admin >> /root/.bashrc echo declare -x SERVICE_ENDPOINT="http://localhost:35357/v2.0" >> /root/.bashrc echo declare -x OS_AUTH_URL="http://localhost:5000/v2.0/" >> /root/.bashrc |
2. Install Ubuntu 12.04 on either a bare metal server or a VirtualBox instance with a two nics. Eth0 will be your wired NIC while eth1 can be a “host-only” adapter.
3. Set the variables in the beginning of the script. They are mostly for your IPs or password. The default defined addresses install the public interface on 192.168.1.0/24 using a password of openstack. Halfway through the install MySQL will prompt you for a password, use the same one set. I recommend you trying the default install to make sure things are clear for starters.
/etc/network/interfaces looks like this prior to install
Network Configuration
|
1 2 3 4 5 6 7 8 9 10 11 12 13 14 15 16 17 |
; html-script: false ]auto lo iface lo inet loopback auto eth0 iface eth0 inet static address 192.168.1.6 netmask 255.255.255.0 network 192.168.1.0 broadcast 192.168.1.255 dns-nameservers 8.8.8.8 gateway 192.168.1.1 auto eth1 iface eth1 inet manual up ifconfig eth1 up |
4. If you have one working Nic on eth0 and an interface up as eth1 along with the ENVs defined this will pretty much install itself. For the MySQL password use the same password that you use in the Python script.
Run the Py Script
Run the Python script by typing
|
1 2 3 4 |
; html-script: false ]Name the downloaded file to something.py python oStackEssex.py |
If you want to install by hand you can just go through the script or use this walk through
Post problems you have and I will do my best to get back to you here as soon as time permits. Use this however you want. Spread the OpenStack word! I have an installer for OpenStack + Quantum finished I will get posted in the next couple of days. Cyas.


This is much more flexible than pure shell scripting and/or datacenter automation (i.e. cfengine, Puppets).
Great work and excellent way to contribute!
Thanks Theodis appreciate the comment. Cheers!
Thanks for your tutorial,but i have a problem
after Backup /etc/network/interfaces in your script and restarting the network, it fails
and my network is down.
I solved the failing by return the backup and restart, but still my network is down.
How can i solve it?
Great work, thank you!
Just a correction for those who are interested in using euca2ools:
The variable “PWORD” in the lines 299, 300 of the script, must be replaced with the variable “pubaddr”
Is there a way to modify your script to allow the use of IPv6 addresses instead of IPv4?